Howto essential: Difference between revisions
(Created page with "=== How to start with the Bondix essential cloud service. === ==== Installing the Bondix client ==== You can find the latest Bondix client for your Teltonika device on our website at: Downloads#Teltonika Routers center|frameless|571x571px Please download the client which matches your device and RutOS version. - IMPORTANT!: Please note that the Bondix client is only working with its specific RutOS Version. For example, if you run a Telton...") |
|||
| (4 intermediate revisions by 2 users not shown) | |||
| Line 1: | Line 1: | ||
=== How to start with the Bondix | === How to start with the Bondix Essential Cloud service === | ||
==== Installing the Bondix client ==== | ==== Installing the Teltonika Bondix client ==== | ||
You can find the latest Bondix client for your Teltonika device on our website at: | You can find the latest Bondix client for your Teltonika device on our website at: | ||
[[Downloads#Teltonika Routers]] | [[Downloads#Teltonika Routers]] | ||
[[File: | |||
[[File:Mh65.png|center|frameless|902x902px]] | |||
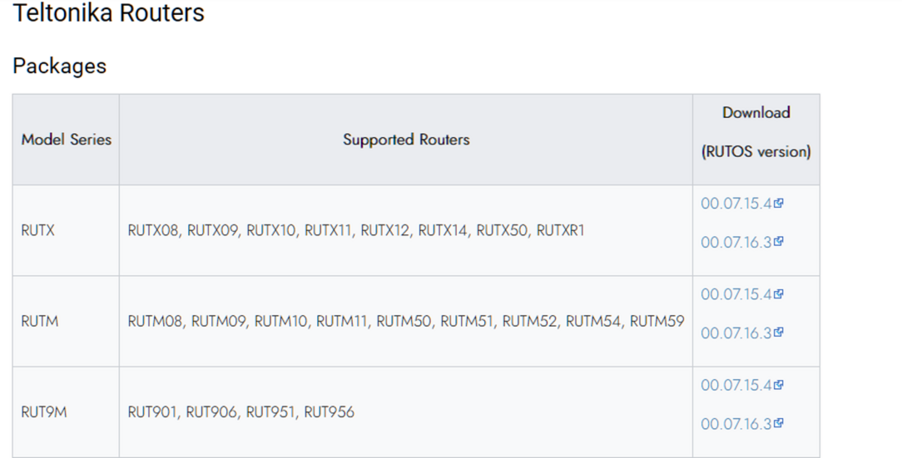
Please download the client which matches your device and RutOS version. | Please download the client which matches your device and RutOS version. | ||
- | '''- IMPORTANT!:''' | ||
IMPORTANT!: | |||
Please note that the Bondix client is only working with its specific RutOS Version. For example, if you run a Teltonika device with RutOS 7.16. you will need to upgrade to 7.16.3 to use the Bondix client. | Please note that the Bondix client is only working with its specific RutOS Version. For example, if you run a Teltonika device with RutOS 7.16. you will need to upgrade to 7.16.3 to use the Bondix client. | ||
| Line 18: | Line 17: | ||
This can sometimes also include the need to downgrade a Teltonikas RutOS to a matching version, in advance to the Bondix client installation. | This can sometimes also include the need to downgrade a Teltonikas RutOS to a matching version, in advance to the Bondix client installation. | ||
- | '''-''' | ||
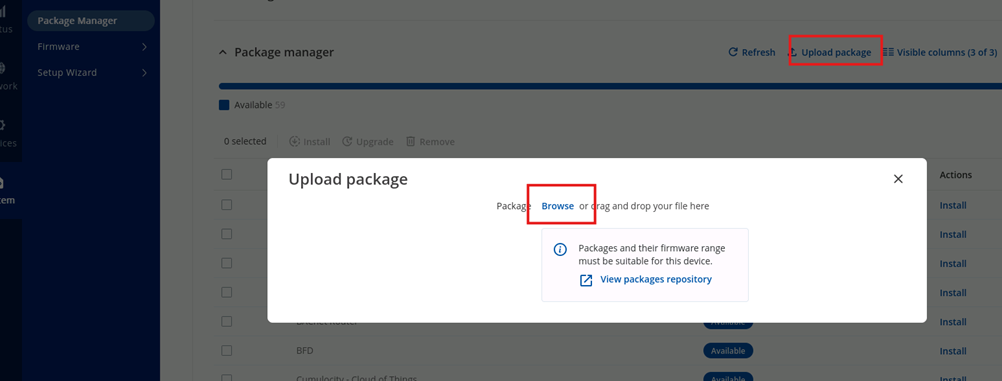
After you downloaded the matching client, use the Teltonika package manager in the System menu to install the Bondix client | After you downloaded the matching client, use the Teltonika package manager in the System menu to install the Bondix client | ||
[[File: | [[File:Grafik11.png|center|frameless|1002x1002px]] | ||
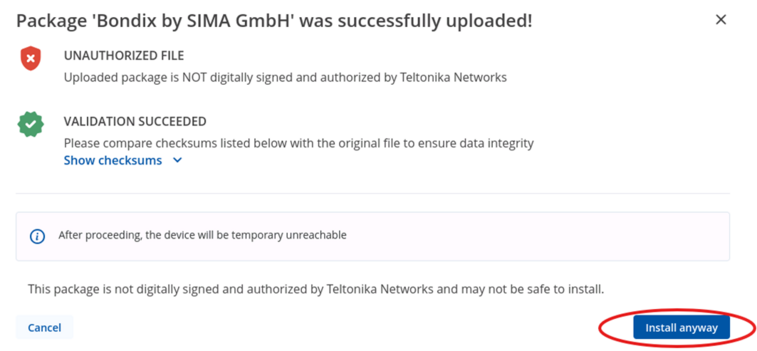
and confirm the installation: | and confirm the installation: | ||
[[File:Bgbf65.png|center|frameless|757x757px]] | |||
[[File: | |||
After you proceeded the following reboot, you will find the Bondix client in the Network menu of your Teltonika device. | After you proceeded the following reboot, you will find the Bondix client in the Network menu of your Teltonika device. | ||
| Line 35: | Line 32: | ||
To configure this server, just use the Network DNS menu of your Teltonika device to add DNS servers of your choice (in our example, Google DNS). | To configure this server, just use the Network DNS menu of your Teltonika device to add DNS servers of your choice (in our example, Google DNS). | ||
[[File: | [[File:Gra44.png|center|frameless|954x954px]] | ||
==== Setting up the Bondix tunnel ==== | ==== Setting up the Bondix tunnel ==== | ||
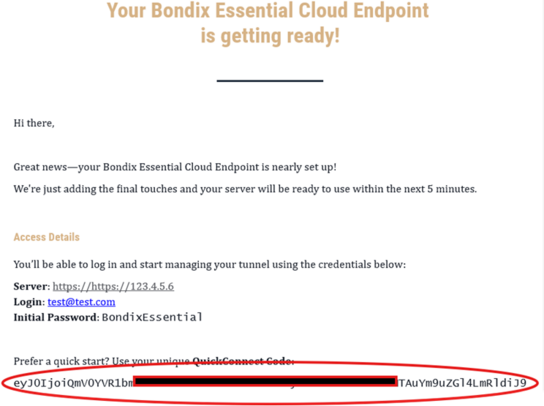
After the successful subscription to the '''Bondix Essential Cloud''' service, you will receive an email with your Bondix tunnel credentials. For a speedy start, the most relevant information in the email is your unique '''Bondix QuickConnect code'''. | After the successful subscription to the '''Bondix Essential Cloud''' service, you will receive an email with your Bondix tunnel credentials. For a speedy start, the most relevant information in the email is your unique '''Bondix QuickConnect code'''. | ||
[[File: | [[File:Ccf.png|center|frameless|544x544px]] | ||
To start, just copy this code from your email and enter it in the '''QuickConnect code''' menu of your Teltonika’s Bondix client: | To start, just copy this code from your email and enter it in the '''QuickConnect code''' menu of your Teltonika’s Bondix client: | ||
[[File: | [[File:Dd53.png|center|thumb|1152x1152px]] | ||
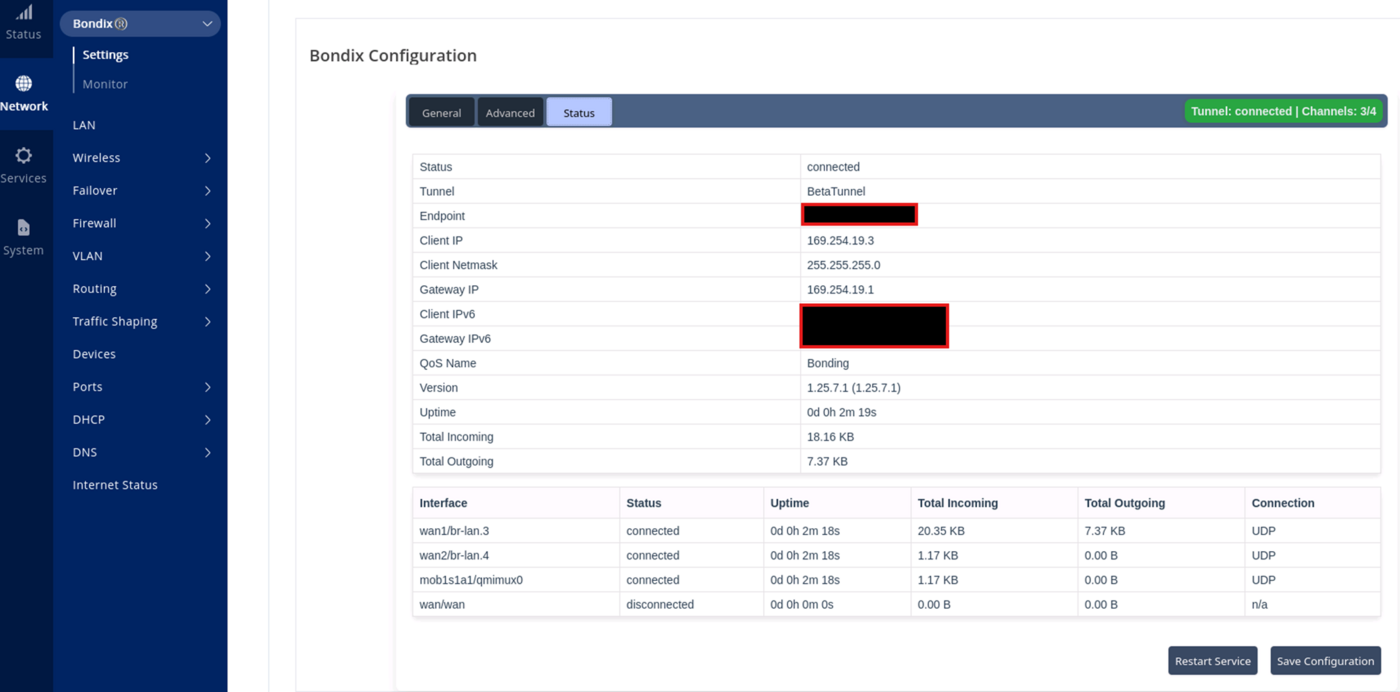
then switch the Enabled button to active and press the '''Save configuration''' button. | |||
And that´s it | ==== And that´s it ==== | ||
[[File: | [[File:Gk65.png|center|frameless|1400x1400px]] | ||
Latest revision as of 10:39, 4 August 2025
How to start with the Bondix Essential Cloud service
Installing the Teltonika Bondix client
You can find the latest Bondix client for your Teltonika device on our website at:
Please download the client which matches your device and RutOS version.
- IMPORTANT!:
Please note that the Bondix client is only working with its specific RutOS Version. For example, if you run a Teltonika device with RutOS 7.16. you will need to upgrade to 7.16.3 to use the Bondix client.
This can sometimes also include the need to downgrade a Teltonikas RutOS to a matching version, in advance to the Bondix client installation.
-
After you downloaded the matching client, use the Teltonika package manager in the System menu to install the Bondix client
and confirm the installation:
After you proceeded the following reboot, you will find the Bondix client in the Network menu of your Teltonika device.
Preparing DNS
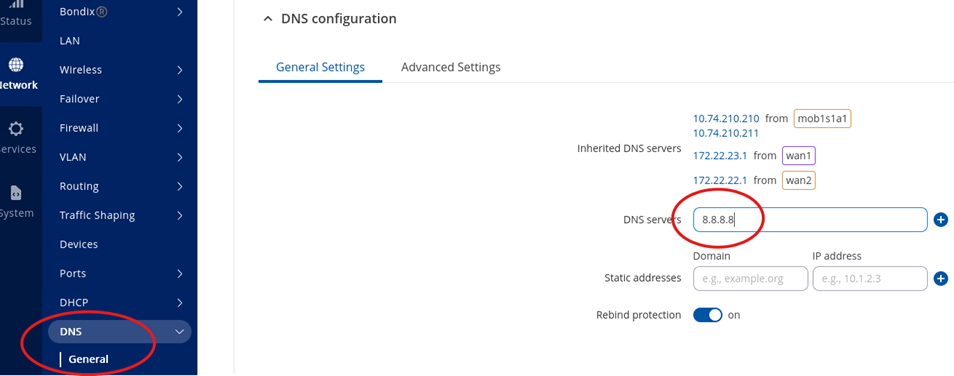
For proper internet access while the Bondix tunnel is used, your Teltonika router will need a dedicated DNS server configuration besides the server addresses your router may obtain from the used carriers.
To configure this server, just use the Network DNS menu of your Teltonika device to add DNS servers of your choice (in our example, Google DNS).
Setting up the Bondix tunnel
After the successful subscription to the Bondix Essential Cloud service, you will receive an email with your Bondix tunnel credentials. For a speedy start, the most relevant information in the email is your unique Bondix QuickConnect code.
To start, just copy this code from your email and enter it in the QuickConnect code menu of your Teltonika’s Bondix client:
then switch the Enabled button to active and press the Save configuration button.
