Server/Changing Ports: Difference between revisions
(make it more concise) |
No edit summary |
||
| Line 1: | Line 1: | ||
The Bondix server typically uses TCP port 443 for its web interface and to handle incoming tunnel connections, employing TCP for control messages and UDP for data transfers. To modify these port settings or segregate them for enhanced security and restricted access to the server's web interface, follow this guide to adjust the default TCP port configuration. | |||
== Modifying the TCP Port Configuration == | |||
TCP port settings are located in ''/etc/saneserver.json'', formatted in JSON. Avoid syntax errors in this file to prevent the server daemon from failing to start. The default configuration sets up a TCP listener as follows: | |||
<pre> | |||
{"target": "server", "action": "add-https", "host": "0.0.0.0", "port": "443", "allowMonitor": true}, | |||
</pre> | |||
This configuration listens on any IPv4 address on port 443, with "allowMonitor" enabled for web interface access. | |||
=== | == Differentiating Web Interface and Incoming Tunnels == | ||
<pre> | Replace the default command with two distinct commands to separate the web interface from incoming tunnel connections: | ||
<pre> | |||
{"target": "server", "action": "add-https", "host": "10.10.0.1", "port": "443", "allowMonitor": true, "allowTunnel": false}, | |||
{"target": "server", "action": "add-https", "host": "1.2.3.4", "port": "44343", "allowMonitor": false}, | |||
</pre> | </pre> | ||
The first command configures a listener on a private network IP with web interface access only, and the second sets up a listener for incoming tunnel connections on a custom port, rejecting other requests with HTTP 405 errors. | |||
== Ensuring Configuration Validity and Server Restart == | |||
Verify the JSON syntax of ''/etc/saneserver.json'' before restarting the server. Use `json_pp` for syntax verification. | |||
<pre> | |||
cat /etc/saneserver.json | json_pp | |||
</pre> | |||
Restart the Bondix server with: | |||
<pre> | |||
sudo systemctl restart bondix | |||
<pre> | </pre> | ||
== Client Configuration for Non-standard Ports == | |||
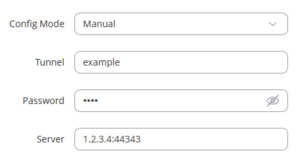
[[File:Bondix Client Custom Port.png|thumb|Entering a endpoint server IP using custom TCP port 44343]] | [[File:Bondix Client Custom Port.png|thumb|Entering a endpoint server IP using custom TCP port 44343]] | ||
For a custom port, specify this port in the client's server string, appending the port number after the IP address, separated by a colon. | |||
Revision as of 12:21, 2 February 2024
The Bondix server typically uses TCP port 443 for its web interface and to handle incoming tunnel connections, employing TCP for control messages and UDP for data transfers. To modify these port settings or segregate them for enhanced security and restricted access to the server's web interface, follow this guide to adjust the default TCP port configuration.
Modifying the TCP Port Configuration
TCP port settings are located in /etc/saneserver.json, formatted in JSON. Avoid syntax errors in this file to prevent the server daemon from failing to start. The default configuration sets up a TCP listener as follows:
{"target": "server", "action": "add-https", "host": "0.0.0.0", "port": "443", "allowMonitor": true},
This configuration listens on any IPv4 address on port 443, with "allowMonitor" enabled for web interface access.
Differentiating Web Interface and Incoming Tunnels
Replace the default command with two distinct commands to separate the web interface from incoming tunnel connections:
{"target": "server", "action": "add-https", "host": "10.10.0.1", "port": "443", "allowMonitor": true, "allowTunnel": false},
{"target": "server", "action": "add-https", "host": "1.2.3.4", "port": "44343", "allowMonitor": false},
The first command configures a listener on a private network IP with web interface access only, and the second sets up a listener for incoming tunnel connections on a custom port, rejecting other requests with HTTP 405 errors.
Ensuring Configuration Validity and Server Restart
Verify the JSON syntax of /etc/saneserver.json before restarting the server. Use `json_pp` for syntax verification.
cat /etc/saneserver.json | json_pp
Restart the Bondix server with:
sudo systemctl restart bondix
Client Configuration for Non-standard Ports
For a custom port, specify this port in the client's server string, appending the port number after the IP address, separated by a colon.
