Server: Difference between revisions
(remove or replace SANE) |
|||
| Line 4: | Line 4: | ||
== Preparations == | == Preparations == | ||
To install the Bondix S | To install the Bondix S Server, you will need a few minutes of stable Internet, a web browser, and possibly some coffee or tea. | ||
=== Supported Browsers === | === Supported Browsers === | ||
The following browsers have been tested to function properly with Bondix | The following browsers have been tested to function properly with the Bondix server: | ||
* Google Chrome | * Google Chrome | ||
* MS Edge | * MS Edge | ||
* Mozilla Firefox | * Mozilla Firefox | ||
=== Updating the | === Updating the Bondix Server === | ||
If you want to update your Bondix | If you want to update your Bondix server version, first delete the old installation scripts on your Linux VM by using the following command: | ||
<nowiki>rm install-bondix-server.sh*</nowiki> | <nowiki>rm install-bondix-server.sh*</nowiki> | ||
| Line 32: | Line 32: | ||
Make sure your server has a public static IP and is reachable from the Internet. | Make sure your server has a public static IP and is reachable from the Internet. | ||
Execute the following script in the terminal window of your server to download the latest version of the | Execute the following script in the terminal window of your server to download the latest version of the Bondix server: | ||
<nowiki>wget https://releases.bondix.dev/endpoint/install-bondix-server.sh</nowiki> | <nowiki>wget https://releases.bondix.dev/endpoint/install-bondix-server.sh</nowiki> | ||
| Line 49: | Line 49: | ||
</gallery> | </gallery> | ||
After completing the installation, you can reach | After completing the installation, you can reach the Bondix server web interface at the IP address shown. Log in with the username “admin” and the password previously generated during installation. | ||
<gallery widths="300" heights="200"> | <gallery widths="300" heights="200"> | ||
| Line 55: | Line 55: | ||
</gallery> | </gallery> | ||
== Bondix | == Bondix Server == | ||
=== Licensing === | === Licensing === | ||
If your server is not already licensed, you first need to activate the S.A.NE Server Tunnel license under the menu item “Licensing”. | If your server is not already licensed, you first need to activate the S.A.NE Server Tunnel license under the menu item “Licensing”. | ||
| Line 80: | Line 80: | ||
=== Administration === | === Administration === | ||
==== Overview ==== | ==== Overview ==== | ||
This is the web interface of a licensed | This is the web interface of a licensed Bondix server. | ||
<gallery widths="500" heights="500"> | <gallery widths="500" heights="500"> | ||
| Line 86: | Line 86: | ||
</gallery> | </gallery> | ||
==== Bondix | ==== Bondix Tunnels ==== | ||
To connect a | To connect a Bondix-compatible router to a Bondix server, you first need to create a tunnel for this respective router. Only then does the server know that there will be a new router to receive data from and send data to. | ||
===== Create a new | ===== Create a new Bondix tunnel ===== | ||
Navigate to the menu item “Tunnel”. Select the tunnel environment for which you want to create the tunnel by clicking the corresponding tab; the default is set to “env0”. Then, assign a unique tunnel name and press “Create”. | Navigate to the menu item “Tunnel”. Select the tunnel environment for which you want to create the tunnel by clicking the corresponding tab; the default is set to “env0”. Then, assign a unique tunnel name and press “Create”. | ||
| Line 111: | Line 111: | ||
</gallery> | </gallery> | ||
===== Connect a compatible router to a | ===== Connect a compatible router to a Bondix server. ===== | ||
Make sure that the latest Bondix | Make sure that the latest Bondix client is installed on your router. Go to the settings menu of your router’s Bondix client and enter the server’s IP address and the tunnel name and password you created in chapter 3.2.2 in the corresponding fields. Save your entry and then restart the service (Restart Service). | ||
<gallery widths="500" heights="500"> | <gallery widths="500" heights="500"> | ||
| Line 118: | Line 118: | ||
</gallery> | </gallery> | ||
The tunnel is now listed in the | The tunnel is now listed in the Bondix server’s menu “Overview” including the number of its active connections. Click on the tunnel name to access the tunnel settings and options. | ||
<gallery widths="500" heights="300"> | <gallery widths="500" heights="300"> | ||
| Line 144: | Line 144: | ||
''' Function “Override Client Settings” ''' | ''' Function “Override Client Settings” ''' | ||
If you activate this on server side, local tunnel presets and WAN priority settings of the connected router are overwritten or reset by the server’s | If you activate this on server side, local tunnel presets and WAN priority settings of the connected router are overwritten or reset by the server’s settings. You will need to restart the tunnel. | ||
<gallery widths="500" heights="300"> | <gallery widths="500" heights="300"> | ||
| Line 169: | Line 169: | ||
===== Tunnel Environments ===== | ===== Tunnel Environments ===== | ||
In Bondix | In the Bondix server, a tunnel environment is a pool of resources used by a group of tunnels. This includes packet cache, CPU core, a UDP listener, and a virtual network interface. | ||
====== Add Environments ====== | ====== Add Environments ====== | ||
During the | During the Bondix server installation, the software automatically creates a default environment with the name “env0”. You can create and add further environments via the menu item “Add Environment”. | ||
<gallery widths="500" heights="300"> | <gallery widths="500" heights="300"> | ||
| Line 192: | Line 192: | ||
====== Activate Tunnel-to-Tunnel Communication ====== | ====== Activate Tunnel-to-Tunnel Communication ====== | ||
The option “Disable traffic among routers” is activated by default due to Bondix | The option “Disable traffic among routers” is activated by default due to Bondix providing multi-tenancy support. This feature prevents routers assigned to a Tunnel Environment from communicating with each other. If you deactivate “Disable traffic among routers”, routers in the same environment can interact. You can adjust this setting separately for each environment. | ||
== Troubleshooting == | == Troubleshooting == | ||
Sometimes, your Bondix | Sometimes, your Bondix server may not not work as expected. If that happens, you may find possible solutions in this section. | ||
{| class="wikitable" | {| class="wikitable" | ||
! Problem !! Solution | ! Problem !! Solution | ||
Revision as of 08:44, 4 April 2025
Start > Marketing Material > Manuals > S.A.NE Server v01
Preparations
To install the Bondix S Server, you will need a few minutes of stable Internet, a web browser, and possibly some coffee or tea.
Supported Browsers
The following browsers have been tested to function properly with the Bondix server:
- Google Chrome
- MS Edge
- Mozilla Firefox
Updating the Bondix Server
If you want to update your Bondix server version, first delete the old installation scripts on your Linux VM by using the following command:
rm install-bondix-server.sh*
After that, just repeat the installation process as described above.
⚠️ This will NOT delete your server configuration! It will only delete the installation scripts and a recommended measure before updating your server. ⚠️
Installing the Linux VM (Ubuntu 20.4)
⚠️ For the installation, you will need root rights. ⚠️
Set your firewalls to the following settings:
S.A.NE server port shares
- TCP: 443, 80
- UDP: 44343
SSH (Optional): 22
Make sure your server has a public static IP and is reachable from the Internet.
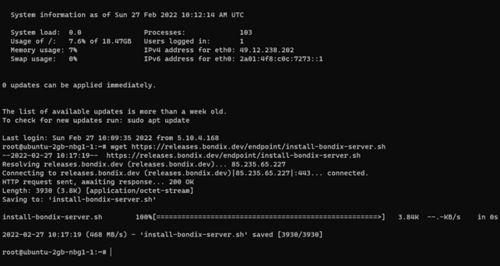
Execute the following script in the terminal window of your server to download the latest version of the Bondix server:
wget https://releases.bondix.dev/endpoint/install-bondix-server.sh
To start the installation, enter the following commands:
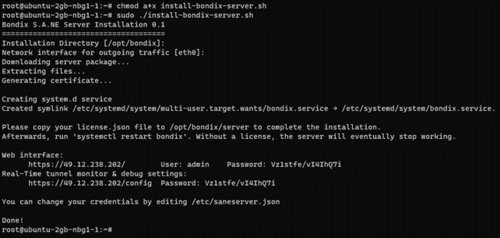
chmod a+x install-bondix-server.sh
sudo ./install-bondix-server.sh
Confirm all the following prompts with the Enter key for a standard installation.
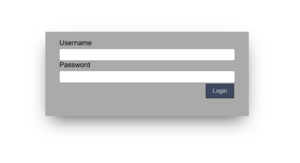
After completing the installation, you can reach the Bondix server web interface at the IP address shown. Log in with the username “admin” and the password previously generated during installation.
Bondix Server
Licensing
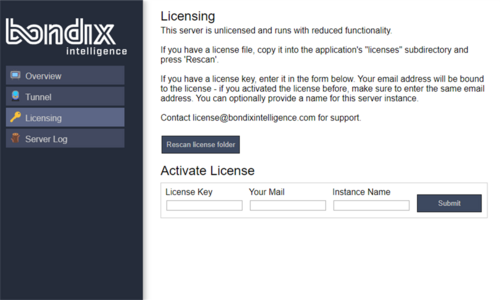
If your server is not already licensed, you first need to activate the S.A.NE Server Tunnel license under the menu item “Licensing”.
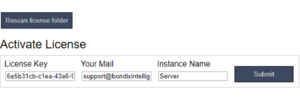
Enter the S.A.NE license key here, as well as a valid email address to which the license key is bound. You can also enter a name for the server instance here. Then press “Submit”.
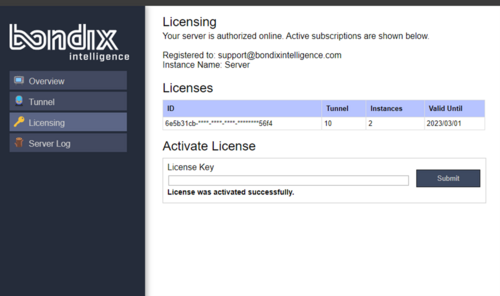
After the successful activation, the Licensing overview will display the number of licensed tunnels as well as the expiry date of your active tunnel subscriptions with the respective expiry date and the maximum number of active server instances possible under this license number.
You can add further additional tunnels/server instances at any time under the item “Activate License”.
Administration
Overview
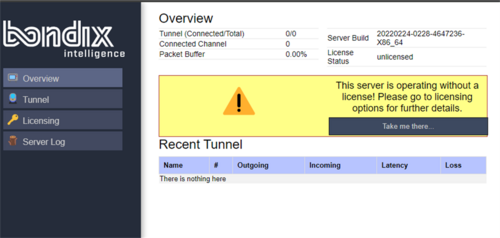
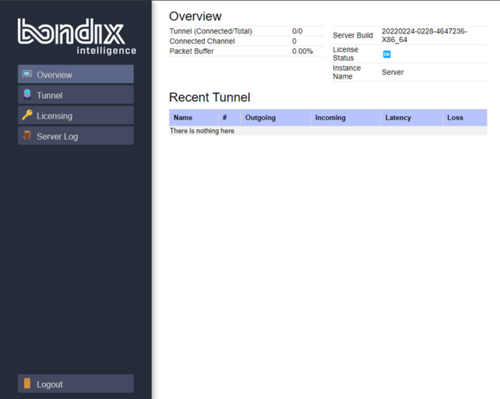
This is the web interface of a licensed Bondix server.
Bondix Tunnels
To connect a Bondix-compatible router to a Bondix server, you first need to create a tunnel for this respective router. Only then does the server know that there will be a new router to receive data from and send data to.
Create a new Bondix tunnel
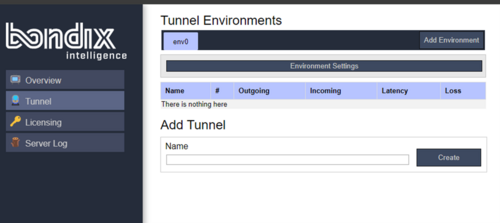
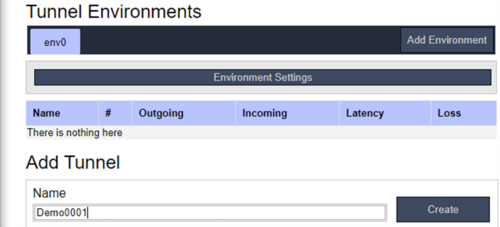
Navigate to the menu item “Tunnel”. Select the tunnel environment for which you want to create the tunnel by clicking the corresponding tab; the default is set to “env0”. Then, assign a unique tunnel name and press “Create”.
⚠️ The tunnel name must not contain any spaces. ⚠️
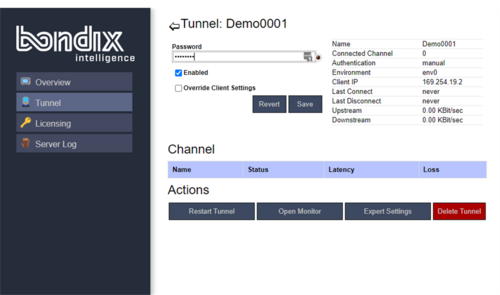
You will then automatically be navigated to the settings window of the newly created tunnel. There, set a password for establishing the connection, make sure that “Enabled” is ticked, and then press “Save”.
Your tunnel is now displayed under the menu item “Overview”. You can access settings for each tunnel simply by clicking on the tunnel name.
Connect a compatible router to a Bondix server.
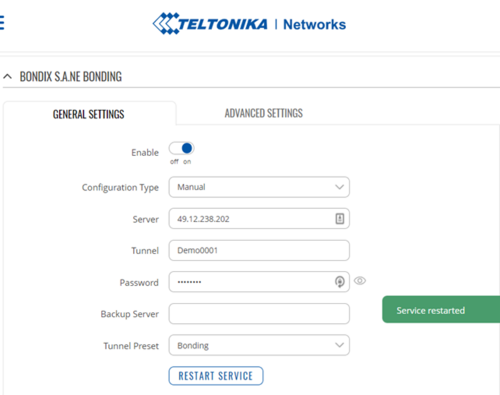
Make sure that the latest Bondix client is installed on your router. Go to the settings menu of your router’s Bondix client and enter the server’s IP address and the tunnel name and password you created in chapter 3.2.2 in the corresponding fields. Save your entry and then restart the service (Restart Service).
The tunnel is now listed in the Bondix server’s menu “Overview” including the number of its active connections. Click on the tunnel name to access the tunnel settings and options.
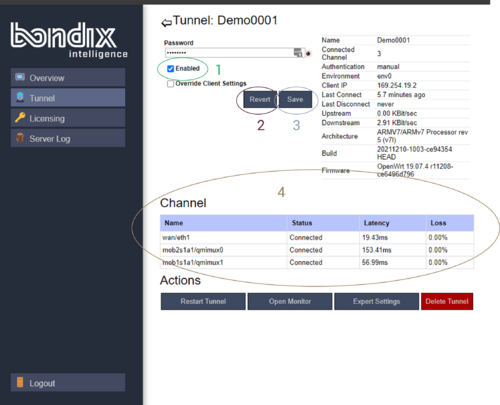
Tunnel details and settings
Functions
| Function | Effect |
|---|---|
| 1 Enabled | Activates (ticked) or deactivates (unticked) the tunnel. |
| 2 Revert | Undoes any changes that have not yet been saved. |
| 3 Save | Saves changes. |
| 4 Channel | Provides an overview of channels currently connected. |
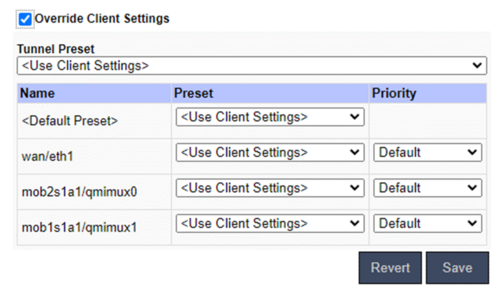
Function “Override Client Settings” If you activate this on server side, local tunnel presets and WAN priority settings of the connected router are overwritten or reset by the server’s settings. You will need to restart the tunnel.
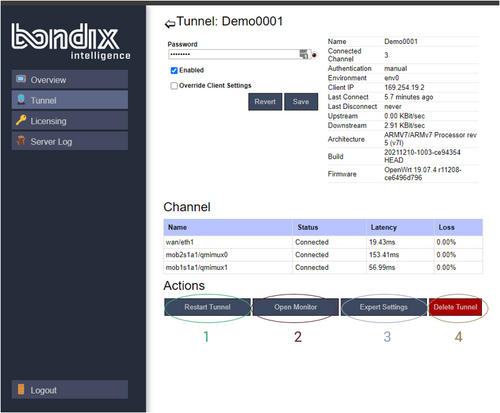
Actions
| Function | Effect |
|---|---|
| 1 Restart tunnel | Allows the tunnel connection to be disconnected briefly and then reconnected. This is needed for some changes to take effect. |
| 2 Open Monitor | Displays a graphical overview of the connections of the router. |
| 3 Expert Settings | Opens the server-side Bondix S.A.NE web monitor for diagnostic purposes. |
| 4 Delete Tunnel | Deletes a tunnel permanently without the possibility to restore it. |
Tunnel Environments
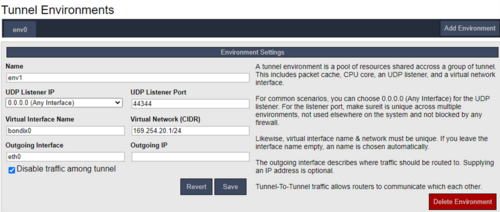
In the Bondix server, a tunnel environment is a pool of resources used by a group of tunnels. This includes packet cache, CPU core, a UDP listener, and a virtual network interface.
Add Environments
During the Bondix server installation, the software automatically creates a default environment with the name “env0”. You can create and add further environments via the menu item “Add Environment”.
UDP Listener settings
For common scenarios, select “0.0.0.0 (Any Interface)” for the UDP Listener IP.
⚠️ Each environment must be assigned its own unique UDP Listener Port. This port must not be used elsewhere in the system, and it must not be blocked by a firewall. ⚠️
Virtual Interface settings
Leave the Virtual Interface Name blank to automatically generate a name for it.
⚠️ The Virtual Interface Name and the Virtual Network (CIDR) assigned to the Tunnel Environment must also be unique, not to be used in any other environment. ⚠️
Outgoing settings
The Outgoing Interface describes where you want to route your data traffic. Optionally, you can enter a specific Outgoing IP address.
Activate Tunnel-to-Tunnel Communication
The option “Disable traffic among routers” is activated by default due to Bondix providing multi-tenancy support. This feature prevents routers assigned to a Tunnel Environment from communicating with each other. If you deactivate “Disable traffic among routers”, routers in the same environment can interact. You can adjust this setting separately for each environment.
Troubleshooting
Sometimes, your Bondix server may not not work as expected. If that happens, you may find possible solutions in this section.
| Problem | Solution |
|---|---|
| ? | Re-install Server (Update) |
| ? | Remove Server |
| ? | Start Bondix Service |
| ? | Stop Bondix Service |
| ? | Server update notification in Web interface update via console |
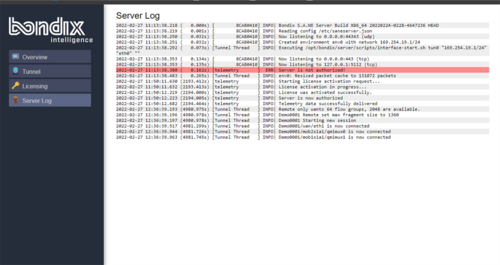
Bondix Server Log
This is an exemplary overview of a server’s current log messages:
Download
Download this manual as a PDF file from here: bondix_server_manual_v1_202202.pdf
