Manuals/Sane-client-tel-rutx12-v0702: Difference between revisions
No edit summary |
|||
| Line 285: | Line 285: | ||
== Download == | == Download == | ||
Download this manual as PDF file here: [] | Download this manual as PDF file here: [] | ||
[[Category:Manual]] | |||
Revision as of 12:42, 31 May 2023
Start > Client > Teltonika Version 7.02.x
This manual can be used for installing the Bondix S.A.NE Client on the following models:
- RUTX50
- RUTX12
- RUT950/955
- RUT360
- RUT240
Preparations
To install the Bondix S.A.NE Client on your Teltonika router, you will need a few minutes of stable Internet, a web browser, and possibly some coffee or tea.
Supported browsers
The following browsers have been tested to function properly with Bondix S.A.NE:
- Google Chrome
- MS Edge
- Mozilla Firefox
Teltonika Firmware
Bondix S.A.NE Clients are available for many Teltonika firmware versions. In order to fully benefit from all new features to their full extend though, we recommend you update your Teltonika router model to its latest Teltonika stable firmware at the Knowledge Base.
Client Installation
| ⚠️ | We strongly recommend you reset all router settings before starting the installation. |
|---|
Visit - Teltonika and download the .TAR.GZ file matching your Teltonika router’s firmware version.
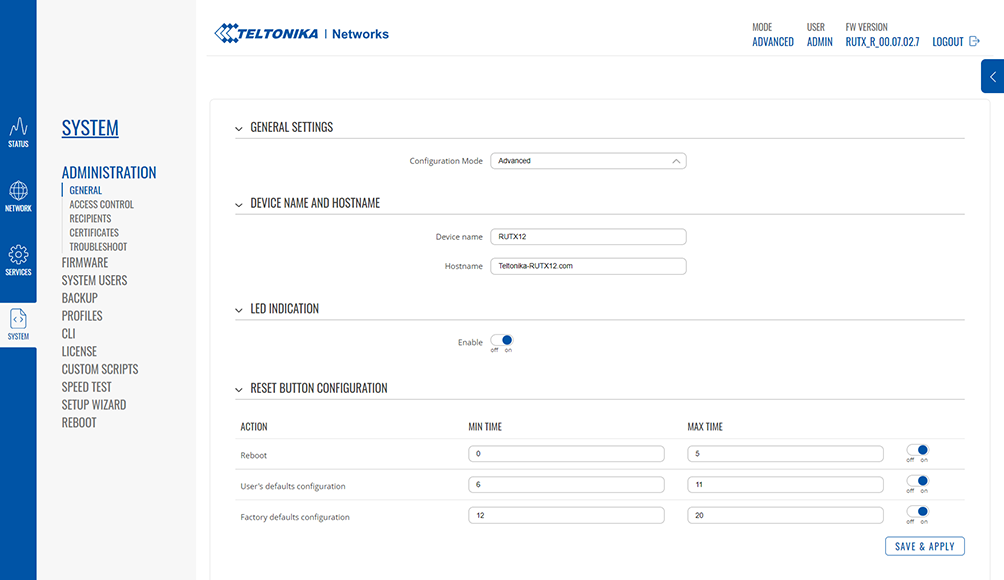
To install the Bondix S.A.NE Client, you will need administration rights on your Teltonika router. For that, make sure you have chosen the option “Advanced” in the section “System” › “Administration” › “General Settings” › “Configuration Mode”.
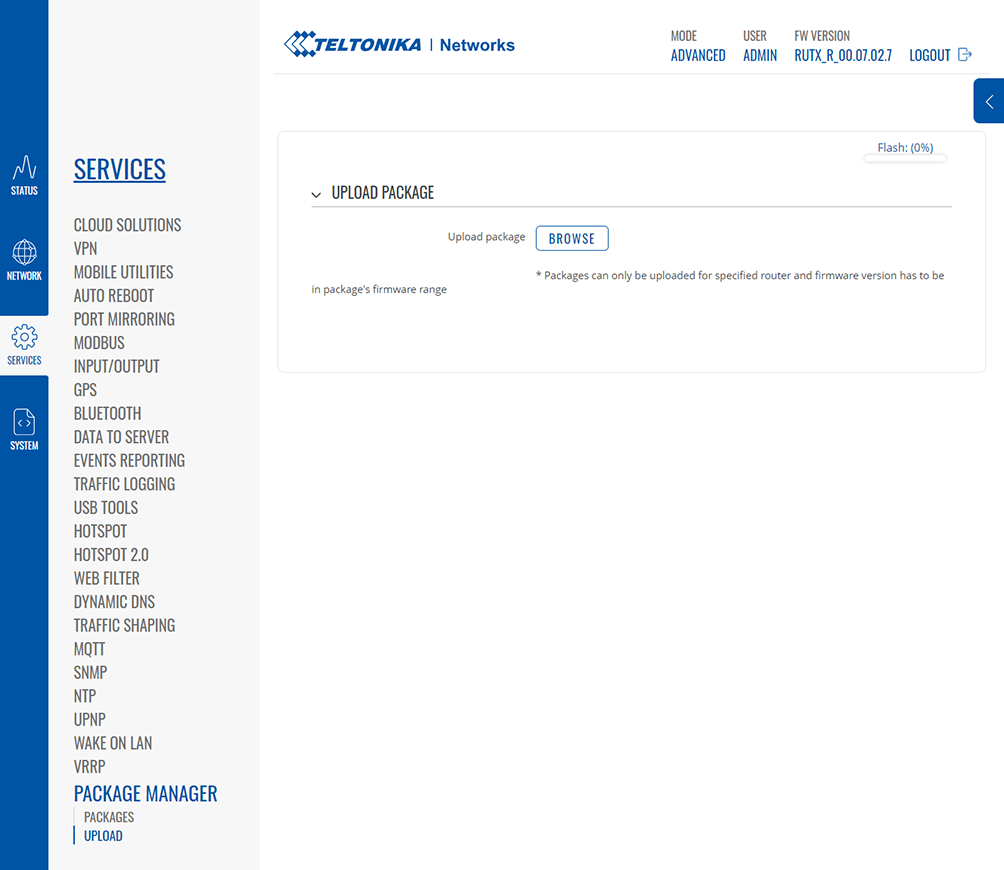
Open your Teltonika router menu, navigate to the menu item “Services” › “Package Manager” › “Upload”. Click on “Browse”, choose the file you just downloaded to upload it to the router, and then press “Install Package”.
| ⚠️ | There will be a package verification popup dialogue telling you the Bondix S.A.NE Client is an unauthorized package.
Click on “proceed” to continue with the installation. |
|---|
Also, there will be a popup dialogue telling you that the package installation needs a reboot. Click on “Reboot” to finish the installation. If this prompt doesn’t appear which may happen due to technical issues, reload your Teltonika router’s web interface (STRG+F5 / Command+R) and reboot manually (“System” › “Reboot”).
If the Bondix S.A.NE Client was installed correctly, you’ll find a new menu item “Bondix S.A.NE” in the section “Network” of your Teltonika router.
General Router Settings
Load Balancing
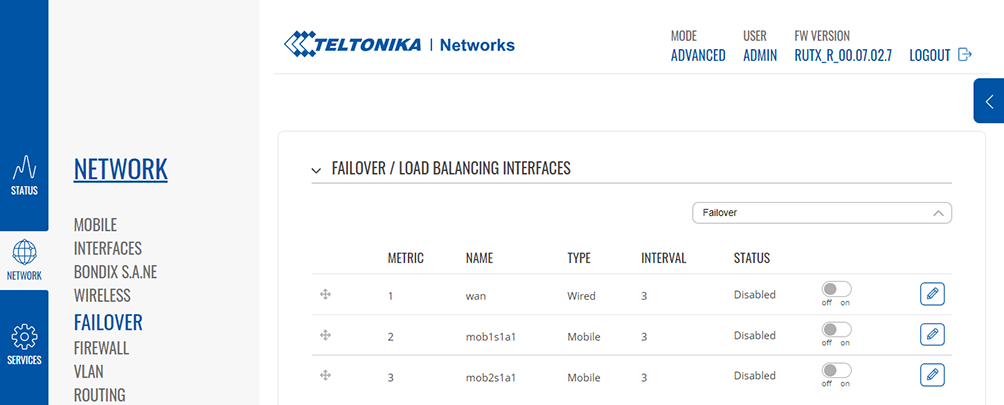
Check that Teltonika Load Balancing functionality is deactivated on the router, as this would have a negative impact on Bondix S.A.NE performance and functionality.
DNS
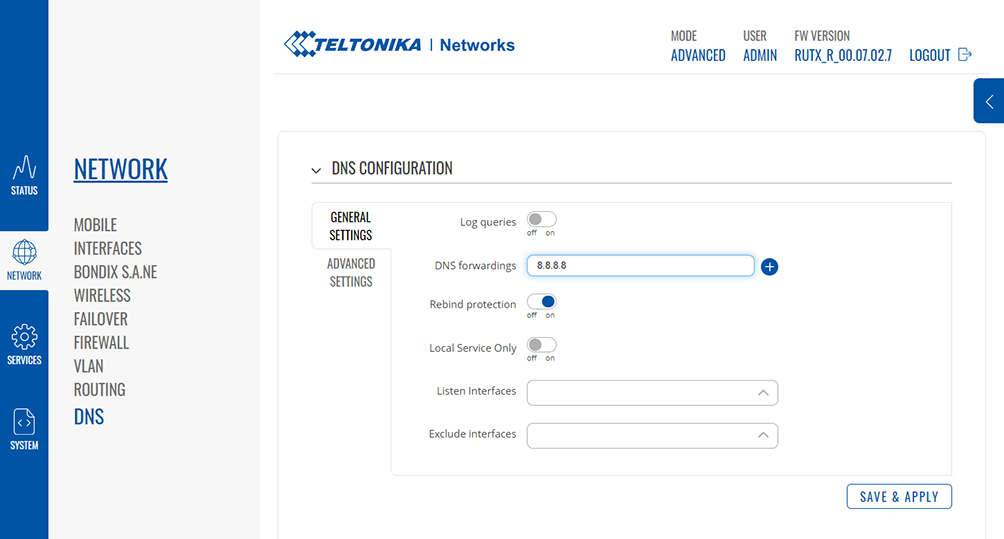
Ensure that you have configured DNS forwarding to a public server like 8.8.8.8 or 9.9.9.9 to receive DNS through the tunnel.
Bondix S.A.NE Settings
Settings
General Settings
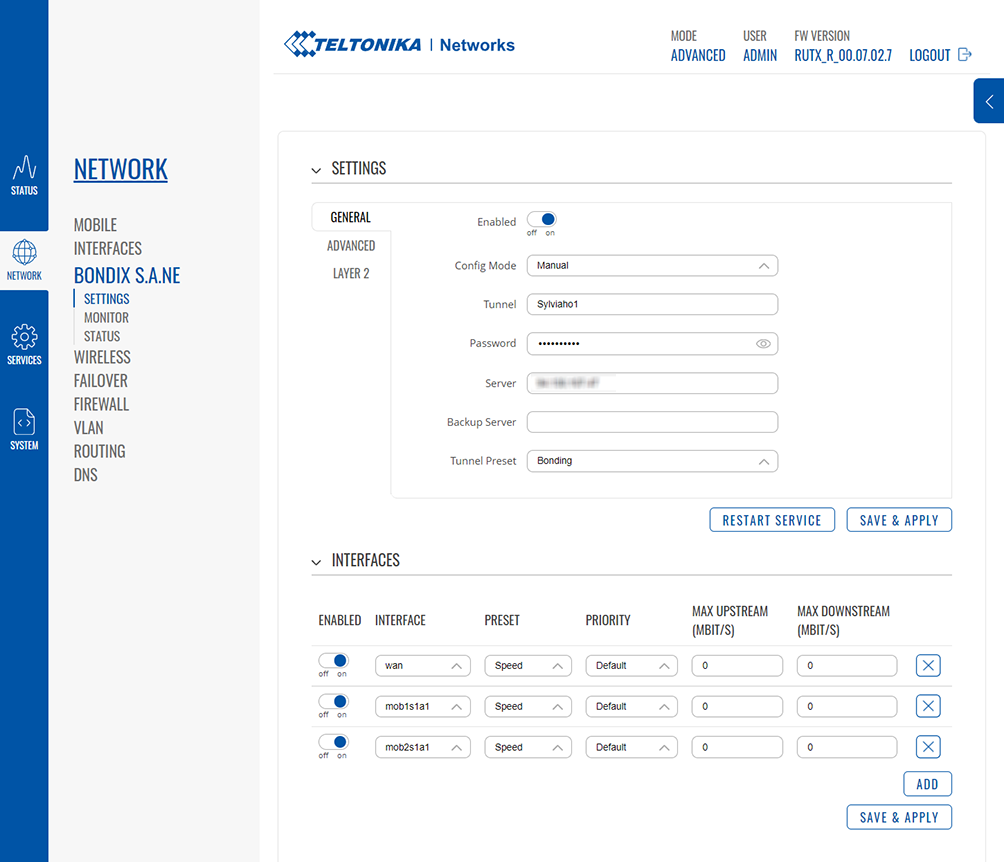
In the general settings for the Bondix S.A.NE Client, you’ll be able to configure your tunnel via different modes of configuration:
Config Mode
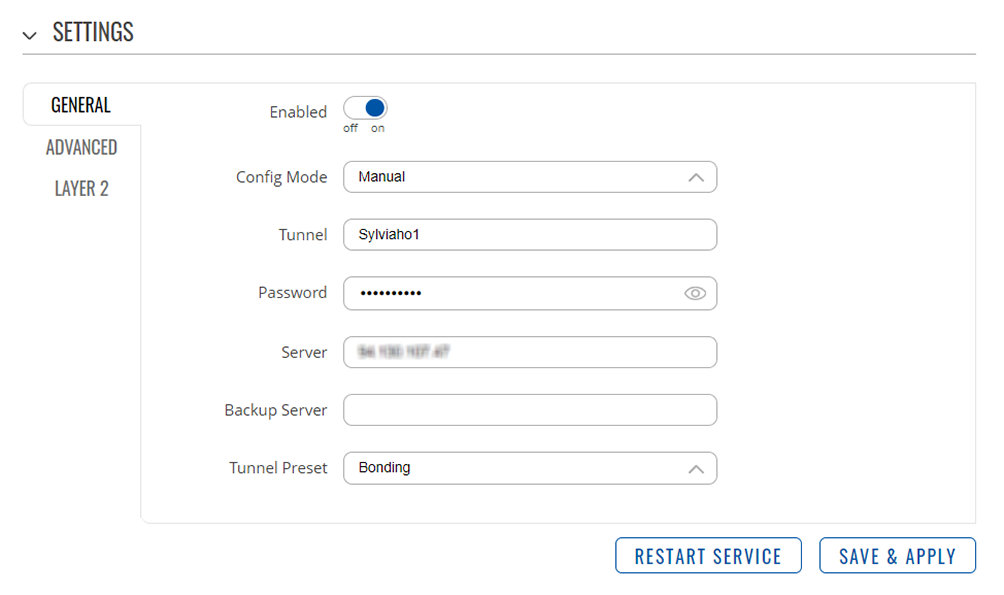
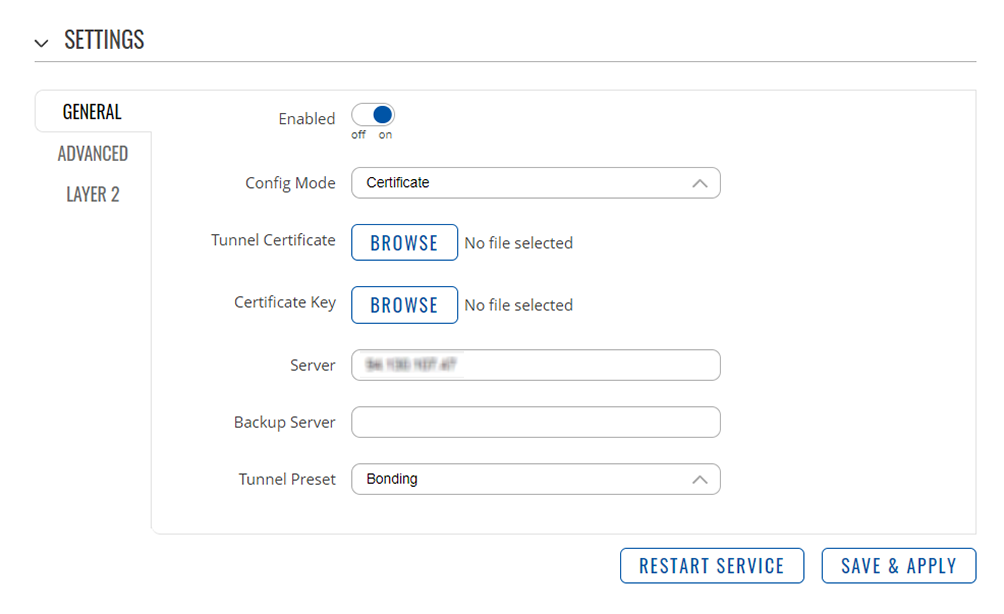
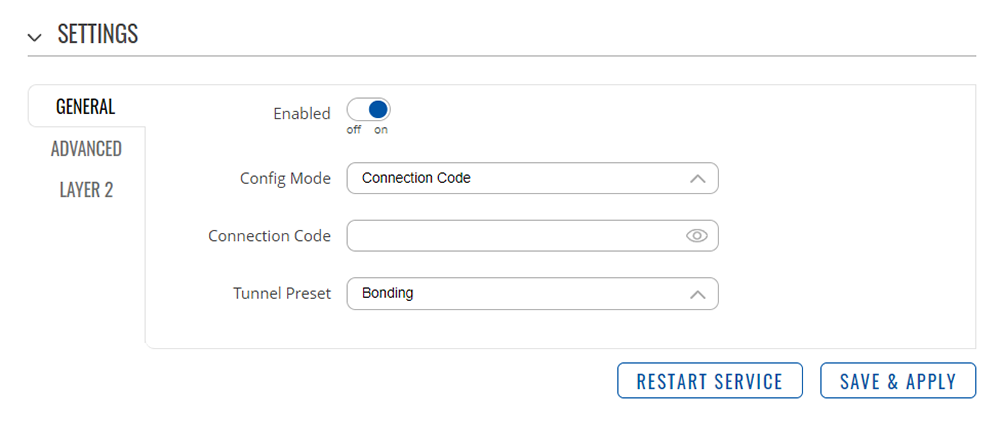
The Config Mode is the method with which you want to enter your Bondix S.A.NE tunnel credentials. It can either be done manually, via certificate, or via Bondix S.A.NE connection code.
Manual
| Field | Value |
|---|---|
| Tunnel | Your tunnel’s name.
This is either part of the credentials you’ve received from your Bondix S.A.NE server provider, or the tunnel name you’ve created in your self-hosted Bondix S.A.NE server. |
| Password | Your password.
This is either part of the credentials you’ve received from your Bondix S.A.NE server provider, or the password you’ve created in your self-hosted Bondix S.A.NE server. |
| Server | Your server IP. This is either part of the credentials you’ve received from your Bondix S.A.NE server provider, or the IP address or host name of your self-hosted Bondix S.A.NE server. |
| Backup Server | A backup server acts as a fallback in case the server you’ve specified under “Server” in this section fails.
This is either part of the credentials you’ve received from your Bondix S.A.NE server provider, or the IP address or host name of your self-hosted Bondix S.A.NE backup server. Otherwise, leave the field empty. |
| ⚠️ | To save your changes, always click on “Save and Apply”, then “Restart Service”. |
|---|
Certificate
| Field | Value |
|---|---|
| Tunnel Certificate | Browse for and upload the Tunnel Certificate which should be in PEM format. |
| Certificate Key | Browse for and upload the Certificate Key which should be in PEM format. |
| Server | Your server IP or host name. |
| Backup Server | Your backup server IP or host name. |
| ⚠️ | To save your changes, always click on “Save and Apply”, then “Restart Service”. |
|---|
Connection Code
The Bondix S.A.NE connection code is an alphanumeric string that is used to automatically configure your tunnel connection. Just copy and paste.
| ⚠️ | To save your changes, always click on “Save and Apply”, then “Restart Service”. |
|---|
WAN Interfaces
In this section, you can prioritize the use WAN connections with two sets of options according to your needs.
Tunnel Preset
| Preset | Effect |
|---|---|
| Bonding | Ensures best performance in regards to bandwidth. |
| Packet Duplication | Used for scenarios where reliability is key: Each packet is sent with a copy.
Please choose this option wisely as it decreases bandwidth to a certain degree. |
| Packet Duplication 2x | Used for scenarios where reliability is key. Each packet is sent with two copies.
Please choose this option wisely as it decreases bandwidth to an even greater degree. |
| Satellite | Mandatory for scenarios where at least one of the bonded WAN links is a satellite connection.
⚠️ Does not apply to Starlink! ⚠️ |
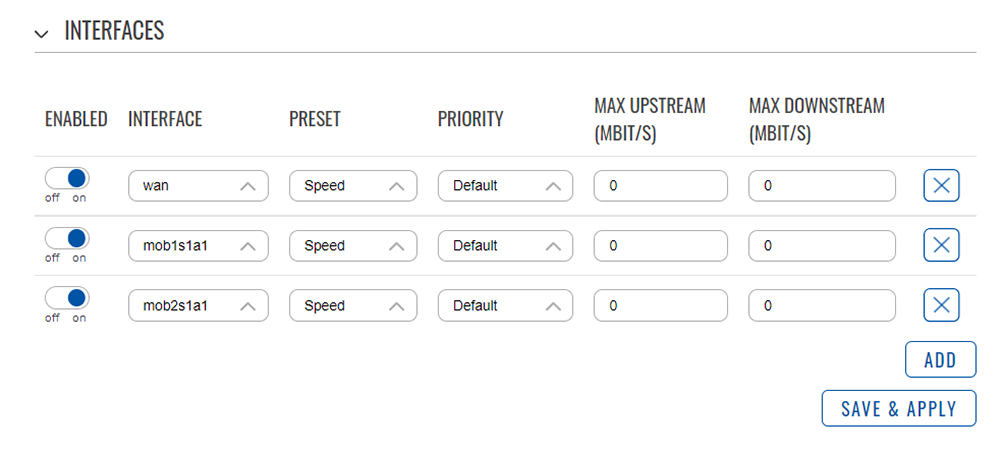
Interfaces
In this section, you can prioritize the use of WAN connections with two sets of options according to your needs.
Preset
Every type of WAN link has different properties that make them suitable for different needs. You can configure them individually to ideally suit your use cases by choosing from 4 Interface presets:
| Preset | Effect |
|---|---|
| Speed | The default setting that works for most scenarios. |
| Low Latency | Keeps latency as low as possible at the expense of bandwidth.
Often used for latency-sensitive scenarios, e.g. streaming. |
| Satellite | Mandatory setting for a high-latency WAN link (e.g. satellite).
⚠️ Does not apply to Starlink! ⚠️ |
| TCP Mode | Useful if UDP traffic is expected to be problematic (e.g. UDP blocking by provider or local network). May cause higher base latency due to the nature of TCP. |
| ⚠️ | To save your changes, always click on “Save and Apply”, then “Restart Service”. |
|---|
Priority
Per default, WAN connections are prioritized in using their available bandwidth according to their latency. S.A.NE usually prioritizes low-latency connections like Ethernet connections. The higher a connection’s latency gets, the lower Bondix S.A.NE sets its priority per default. In this section, you can set individual priorities for your WAN links by choosing from the following 4 options: Default / High Priority / Higher Priority / Highest Priority
| ⚠️ | To save your changes, always click on “Save and Apply”, then “Restart Service”. |
|---|
Up- / Downstream Limit
By design, Bondix S.A.NE normally finds the maximum bandwidth of a WAN link by continually evaluating data traffic generated by users over time. This can cause fluctuating bandwidths and/or increased buffering especially with, but not limited to, mobile connections. Setting a hard up- and/or downstream limit about 5% lower than the known maximum gives S.A.NE a base to work with, stabilizing and increasing the WAN link’s performance.
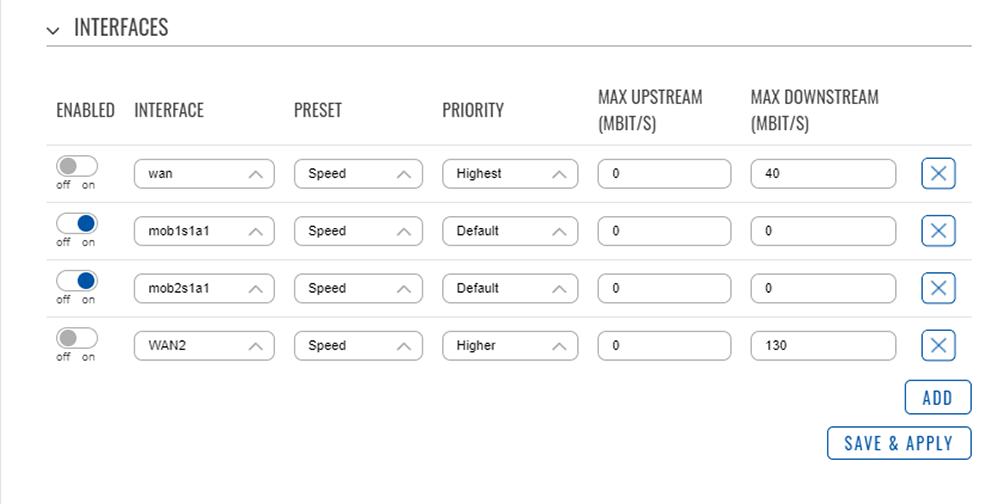
Example
You have 4 WAN links, 2 of which are 5G/LTE connections, and you only want to use those 2 evenly. To achieve that, you disable your 2 other WAN links, while giving your 2 mobile links the preset “Speed” and the priority “Default”:
Advanced Settings
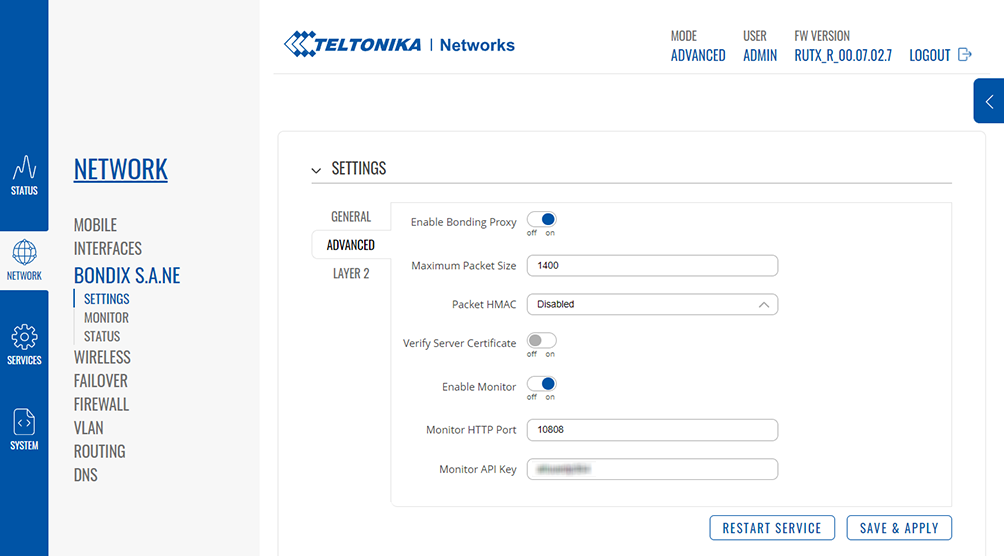
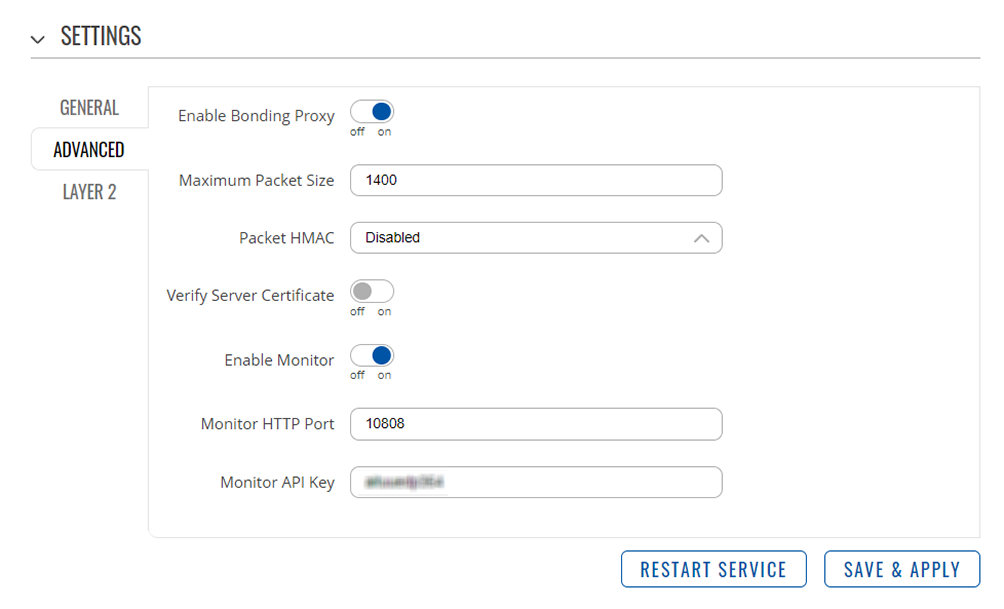
Make sure to choose the following advanced settings for the S.A.NE Client on your Teltonika router:
| Field | Value |
|---|---|
| Enable Bonding Proxy | On
Enable this proxy if you’re bonding connections with vastly different latencies (e.g. DSL and 5G/LTE), since it optimizes TCP connections and increases your overall throughput. |
| Maximum Packet Size | 1400
Change to lower setting if S.A.NE’s automatic MTU packet size detection fails. |
| Packet HMAC | Disabled
Set this value to “SHA256” only if you need tampering-proof data transfer since it reduces the general Bondix S.A.NE performance. |
| Verify Server Certificate | If required, a server certificate can be uploaded here.
Set option to “on” and browse for your CA file to upload. |
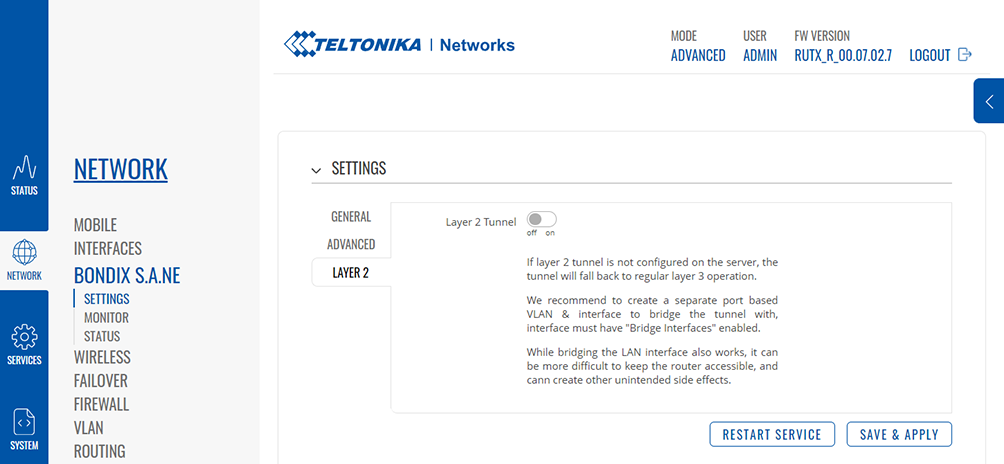
Layer 2
With this option, you can set up a layer-2 tunnel directly with S.A.NE. A layer-2 tunnel is a virtual interface that is created on both client and server for each tunnel–packets coming in on one end will come out the other and vice versa. This is an advanced feature; further configuration must be done server-side depending on the usage scenario. If you need more information on how to use layer 2 with your Teltonika router, please contact Teltonika directly.
Monitor
With this release version, the local Bondix Web Monitor has been integrated in the Teltonika router menu. The monitor will enable you to have a look at the performance of your WAN links and configure their settings in real time. This is especially helpful if one of your WAN links does not perform as expected. The monitor is only available if you’re connected to your router via HTTP. Due to technical reasons, the monitor will not show if you’re using HTTPS to connect to your router (e.g. via Teltonika RMS).
Setup
To set up the monitor, choose the following settings in the Advanced Settings section:
| Field | Value |
|---|---|
| Enable Monitor | On |
| Monitor HTTP Port | This port is set automatically. |
| Monitor API Key | This automatically generated API key is used to show the monitor in the Teltonika router’s Bondix S.A.NE menu. |
| ⚠️ | To save your changes, always click on “Save and Apply”, then “Restart Service”. |
|---|
Traffic Monitor
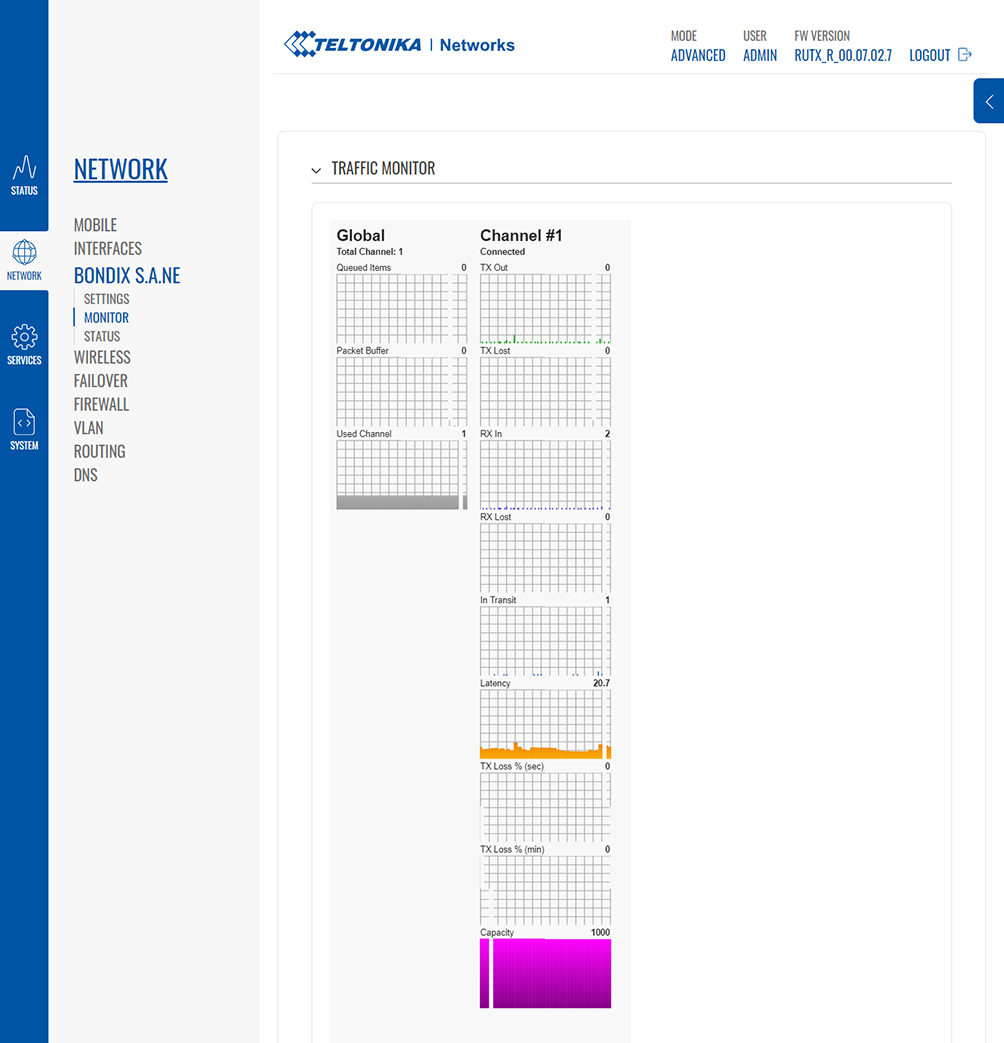
Clicking on the “Monitor” link in your Teltonika router’s Bondix S.A.NE menu will give you a graphical overview of the data traffic and the connection status of your tunnel’s connected WAN links:
Global
| Value | Description |
|---|---|
| Queued Items | Packets that have been received locally but haven’t been sent yet. |
| Packet Buffer | Total amount of packets in cache. |
| Used Channel | Number of active channels. |
Channel
| Value | Description |
|---|---|
| TX Out | Number of outgoing traffic packets. |
| TX Lost | Number of lost outgoing traffic packets. |
| RX In | Number of incoming traffic packets. |
| RX Lost | Number of lost incoming traffic packets. |
| In Transit | Packets that have been sent but not acknowledged yet. |
| Latency | Latency in ms. |
| TX Loss % (sec) | Measured outgoing packet loss over the last second. |
| TX Loss % (min) | Measured outgoing packet loss over the last minute. |
| Capacity | Number of packets that can be sent out through the channel. |
Status
Status information
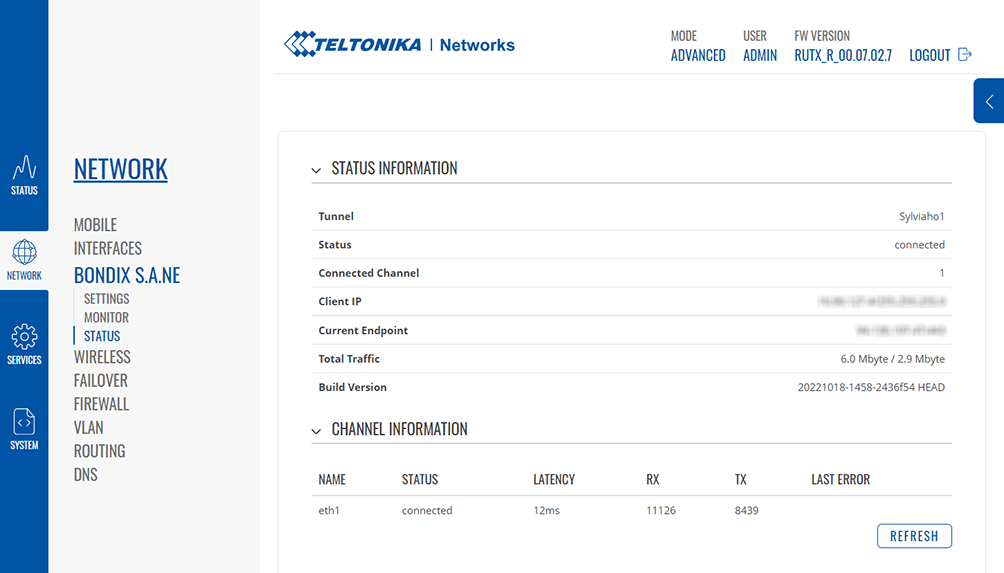
In the Status Information, you can quickly see all facts to your Bondix S.A.NE Client, regarding your overall bonding as well as your individual channels.
| Value | Description |
|---|---|
| Tunnel | Shows the name of your tunnel. |
| Status | Tells you whether your Bondix S.A.NE Client is connected at all. |
| Connected Channels | Gives you the number of WAN links currently active. |
| Client IP | Shows IP/DNS addresses. |
| Current Endpoint | Shows Bondix S.A.NE server’s IP/port. |
| Total Traffic | Shows total upload/download traffic. |
| Build Version | Shows which Bondix S.A.NE Client build you have installed. |
Channel Information
The Channel Information shows you which of your WAN links are available, connected and active, or faulty:
| Value | Description |
|---|---|
| Name | Shows the name you assigned to the specific WAN link. |
| Status | Tells you whether the WAN link is connected, disables, or faulty. |
| Latency | Shows the WAN link’s current latency. |
| RX | Shows incoming traffic. |
| TX | Shows outgoing traffic. |
| Last Error | Displays the error message of a faulty WAN link. |
Download
Download this manual as PDF file here: []
