IPv6: Difference between revisions
No edit summary |
|||
| (5 intermediate revisions by 2 users not shown) | |||
| Line 2: | Line 2: | ||
=IPv6 Setup= | =IPv6 Setup= | ||
By default, Bondix | By default, '''Bondix''' utilizes a randomized link-local IPv6 address range (<code>fe80::/3</code>) as a transport network between the server and client router. This provides basic IPv6 communication, but further configuration is required to enable full IPv6 internet connectivity for both the router and its clients. | ||
==Option 1: Double Masquerading== | ==Option 1: Double Masquerading== | ||
To enable IPv6 masquerading on the server, you need to specify a masquerading IP in the environment settings. Ensure that the tunnel configuration includes a default client route for IPv6 (<code>::/0</code>), which can be found in the tunnel routing settings. Additionally, change the IPv6 transport network from link-local to a private address range (e.g., <code>fdXX::/48</code>), as link-local networks (<code>fe80::/10</code>) are not supported for masquerading. | |||
Client-side, the following requirements must be met: | Client-side, the following requirements must be met: | ||
* | * The router's LAN must be configured with a private IPv6 network. | ||
* | * The router must masquerade outbound IPv6 traffic using its transport IP. | ||
==Option 2: Use a Public IPv6 Transport Network== | ==Option 2: Use a Public IPv6 Transport Network== | ||
[[File:Public Transport Net.png|thumb|Using a public IPv6 network as a transport network]] | [[File:Public Transport Net.png|thumb|Using a public IPv6 network as a transport network]] | ||
Using a public IPv6 transport network | Using a public IPv6 transport network simplifies configuration by removing the need for server-side masquerading. A small subnet, such as <code>/112</code> or <code>/120</code>, is sufficient for each tunnel in the environment, and each tunnel will be assigned a single IP from that subnet. A default client route for IPv6 (<code>::/0</code>) must be configured. | ||
Client-side, the same requirements as Option 1 | Client-side, the same requirements as in Option 1 apply: | ||
* | * The router's LAN must be configured with a private IPv6 network. | ||
* | * The router must masquerade IPv6 traffic using its transport IP. | ||
==Option 3: Route a Public IPv6 Network Through the Tunnel== | ==Option 3: Route a Public IPv6 Network Through the Tunnel== | ||
[[File:IPv6 example routing2.png|thumb|Public IPv6 routing]] | [[File:IPv6 example routing2.png|thumb|Public IPv6 routing]] | ||
For full IPv6 routing, the server must be configured with a public IPv6 network as a server route, and a default client route (<code>::/0</code>) must be added for client traffic. | |||
Client-side, the following requirements | Client-side, the following requirements apply: | ||
* | * The router's LAN must be assigned the routed public IPv6 network. | ||
* Firewall settings must allow IP forwarding from | * Firewall settings must allow IP forwarding to and from the Bondix interface. | ||
=== Client Settings === | === Client Settings === | ||
| Line 34: | Line 34: | ||
==== Teltonika ==== | ==== Teltonika ==== | ||
On Teltonika, Static IPv6 address assignment for the LAN interface via the web interface can be achieved by using the following settings: | |||
<gallery> | |||
File:Screenshots-ipv6-202503-1.png|Manual IPv6 configuration in Teltonika, part 1 | |||
File:Screenshots-ipv6-202503-2.png|Manual IPv6 configuration in Teltonika, part 2 | |||
File:Screenshots-ipv6-202503-3a.png|Manual IPv6 configuration in Teltonika, part 3 | |||
</gallery> | |||
====OpenWrt==== | ====OpenWrt==== | ||
For OpenWRT, manually assign an IPv6 address to the LAN interface, do not configure a gateway. | |||
==== Connected Devices ==== | ==== Connected Devices ==== | ||
For connected devices, you can manually assign IPv6 addresses using the router’s IPv6 address as the gateway. Additionally, ensure that devices use an IPv6 DNS server. | |||
== QoS == | |||
QoS can be extended with IPv6 matching rules. If a rule has no IPv6 rules, suitable IPv4 matching rules will be automatically converted to IPv6, omitting any matching rule with specific IPv4 source or destination IPs. | |||
Latest revision as of 11:52, 31 March 2025
IPv6 Setup
By default, Bondix utilizes a randomized link-local IPv6 address range (fe80::/3) as a transport network between the server and client router. This provides basic IPv6 communication, but further configuration is required to enable full IPv6 internet connectivity for both the router and its clients.
Option 1: Double Masquerading
To enable IPv6 masquerading on the server, you need to specify a masquerading IP in the environment settings. Ensure that the tunnel configuration includes a default client route for IPv6 (::/0), which can be found in the tunnel routing settings. Additionally, change the IPv6 transport network from link-local to a private address range (e.g., fdXX::/48), as link-local networks (fe80::/10) are not supported for masquerading.
Client-side, the following requirements must be met:
- The router's LAN must be configured with a private IPv6 network.
- The router must masquerade outbound IPv6 traffic using its transport IP.
Option 2: Use a Public IPv6 Transport Network
Using a public IPv6 transport network simplifies configuration by removing the need for server-side masquerading. A small subnet, such as /112 or /120, is sufficient for each tunnel in the environment, and each tunnel will be assigned a single IP from that subnet. A default client route for IPv6 (::/0) must be configured.
Client-side, the same requirements as in Option 1 apply:
- The router's LAN must be configured with a private IPv6 network.
- The router must masquerade IPv6 traffic using its transport IP.
Option 3: Route a Public IPv6 Network Through the Tunnel

For full IPv6 routing, the server must be configured with a public IPv6 network as a server route, and a default client route (::/0) must be added for client traffic.
Client-side, the following requirements apply:
- The router's LAN must be assigned the routed public IPv6 network.
- Firewall settings must allow IP forwarding to and from the Bondix interface.
Client Settings
this is work in progress
Teltonika
On Teltonika, Static IPv6 address assignment for the LAN interface via the web interface can be achieved by using the following settings:
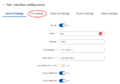
Manual IPv6 configuration in Teltonika, part 1
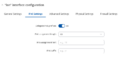
Manual IPv6 configuration in Teltonika, part 2
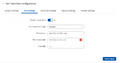
Manual IPv6 configuration in Teltonika, part 3


OpenWrt
For OpenWRT, manually assign an IPv6 address to the LAN interface, do not configure a gateway.
Connected Devices
For connected devices, you can manually assign IPv6 addresses using the router’s IPv6 address as the gateway. Additionally, ensure that devices use an IPv6 DNS server.
QoS
QoS can be extended with IPv6 matching rules. If a rule has no IPv6 rules, suitable IPv4 matching rules will be automatically converted to IPv6, omitting any matching rule with specific IPv4 source or destination IPs.