Teltonika Portforwarding: Difference between revisions
No edit summary |
No edit summary |
||
| (3 intermediate revisions by 2 users not shown) | |||
| Line 1: | Line 1: | ||
[[Category:Client]] | [[Category:Client]] | ||
== Port Forward from a Teltonika router to the server == | |||
In this example, we are going to create two port forwardings to make a | == General port forwarding settings == | ||
For TCP port forwarding a separate configuration of a forwarding on the router with the Bondix client is not necessary if: | |||
* the port forwarding is configured via the web interface | |||
* only TCP ports are forwarded | |||
* the Bonding proxy is in use | |||
* port forwarding is enabled in the Bondix client advanced settings. | |||
For any kind of port forwarding which includes UDP ports, iptables (or equal) rules will be needed on the server side. | |||
In this case, there is also a need to configure a port forwarding on the Bondix client router. For Teltonika see below. | |||
== UDP Port Forward from a Teltonika router to the server == | |||
In this example, we are going to create two port forwardings to make a UDP port behind a Teltonika Router accessible via the endpoint's public IP. The first port forwarding will be created on the router, forwarding traffic from the Bondix tunnel towards the device in LAN. The second port forwarding will be created on the endpoint server, forwarding requests from it's public IP to towards the appropiate tunnel. | |||
But first, lets make sure on the server that the tunnel in question is configured with a fixed IP, as it will make things much easier: | But first, lets make sure on the server that the tunnel in question is configured with a fixed IP, as it will make things much easier: | ||
| Line 13: | Line 26: | ||
[[File:Teltonika Port Forward Settings.png]] | [[File:Teltonika Port Forward Settings.png]] | ||
* Protocol: as required by your needs. Defaults to TCP+UDP | * Protocol: as required by your needs. Defaults to TCP+UDP, change to UDP. | ||
* Source zone: "bondix" (where the request is coming from) | * Source zone: "bondix" (where the request is coming from) | ||
* External port: The port used for the forwarding. This port used here is just intermediate and can be used freely, although it is advised to use a port number higher than 1024. | * External port: The port used for the forwarding. This port used here is just intermediate and can be used freely, although it is advised to use a port number higher than 1024. | ||
| Line 21: | Line 34: | ||
In the firewall general settings, make sure that Masquerading for LAN => Bondix is enabled. | In the firewall general settings, make sure that Masquerading for LAN => Bondix is enabled. | ||
Finally, the second port forwarding must be set up on the server: | Finally, the second port forwarding must be set up on the server: | ||
iptables -A PREROUTING -t nat -i eth0 -p udp --dport 20022 -j DNAT --to 169.254.20.2:12345 | |||
iptables -A FORWARD -p | iptables -A FORWARD -p udp -d 169.254.20.2 --dport 20022 -j ACCEPT | ||
Make sure that the following argument is correct: | Make sure that the following argument is correct: | ||
Latest revision as of 13:02, 12 May 2025
General port forwarding settings
For TCP port forwarding a separate configuration of a forwarding on the router with the Bondix client is not necessary if:
- the port forwarding is configured via the web interface
- only TCP ports are forwarded
- the Bonding proxy is in use
- port forwarding is enabled in the Bondix client advanced settings.
For any kind of port forwarding which includes UDP ports, iptables (or equal) rules will be needed on the server side.
In this case, there is also a need to configure a port forwarding on the Bondix client router. For Teltonika see below.
UDP Port Forward from a Teltonika router to the server
In this example, we are going to create two port forwardings to make a UDP port behind a Teltonika Router accessible via the endpoint's public IP. The first port forwarding will be created on the router, forwarding traffic from the Bondix tunnel towards the device in LAN. The second port forwarding will be created on the endpoint server, forwarding requests from it's public IP to towards the appropiate tunnel.
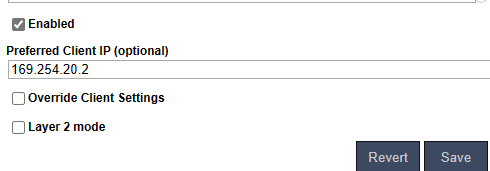
But first, lets make sure on the server that the tunnel in question is configured with a fixed IP, as it will make things much easier:
The IP must be part of the environment's virtual network which the tunnel used (169.254.xx.0/24 by default). In this example, we are using 169.254.20.2.
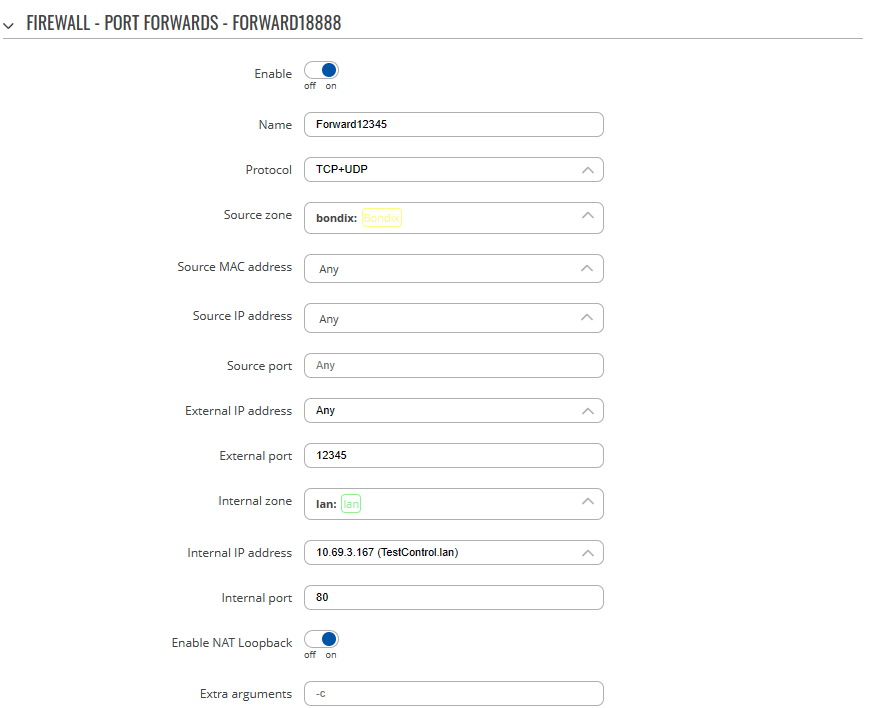
Next, go to the router's webinterface and navigate to Network > Firewall > Port Forwardings. In this example, we are going to create a port forwarding from a device in LAN towards the Bondix tunnel:
- Protocol: as required by your needs. Defaults to TCP+UDP, change to UDP.
- Source zone: "bondix" (where the request is coming from)
- External port: The port used for the forwarding. This port used here is just intermediate and can be used freely, although it is advised to use a port number higher than 1024.
- Internal zone: "lan" (where the request should be forwarded to)
- Internal IP address: the target device
- Internal port: the target port
In the firewall general settings, make sure that Masquerading for LAN => Bondix is enabled.
Finally, the second port forwarding must be set up on the server:
iptables -A PREROUTING -t nat -i eth0 -p udp --dport 20022 -j DNAT --to 169.254.20.2:12345
iptables -A FORWARD -p udp -d 169.254.20.2 --dport 20022 -j ACCEPT
Make sure that the following argument is correct:
- eth0 - the interface name used on your server might differ
- 20022 - this is the port that the will be used for forwarding, and will be publicly accessible.
- 169.254.20.2:12345 - the tunnel ip + intermediate port used.

